Welcome to our comprehensive guide on installing Red Hat Enterprise Linux 8 (RHEL 8) with a focus on adhering to the Center for Internet Security (CIS) Level 1 Benchmarks. This article is designed to provide step-by-step instructions for users looking to set up RHEL 8 in a secure and optimized manner.
Table of Contents
Short Overview About CIS Benchmark
The CIS Level 1 Benchmarks are a set of best practices for securing IT systems and data against cyber threats. By following this guide, administrators and IT professionals can ensure that their Red Hat 8 installations not only meet but exceed industry standards for security, thereby laying a strong foundation for a robust and secure IT infrastructure.
Whether you are new to Red Hat systems or an experienced administrator, this guide aims to equip you with the necessary skills and knowledge to efficiently and securely deploy Red Hat 8 in your environment.
Here is my steps:
Step By Step Guide – Red Hat Enterprise Linux Installation
Firstly, you will need the installer or the ISO image file for Red Hat Enterprise Linux.
If you would like to try it out, you can sign up for a developer account on the Red Hat Official site and download the ISO file at https://developers.redhat.com/rhel8/ to download Red Hat Enterprise
Boot Up Screen
After downloading the ISO file for Red Hat OS, load the ISO file as CD ROM. Then boot it up and select Install Red Hat Enterprise Linux 8.7 on the boot screen.

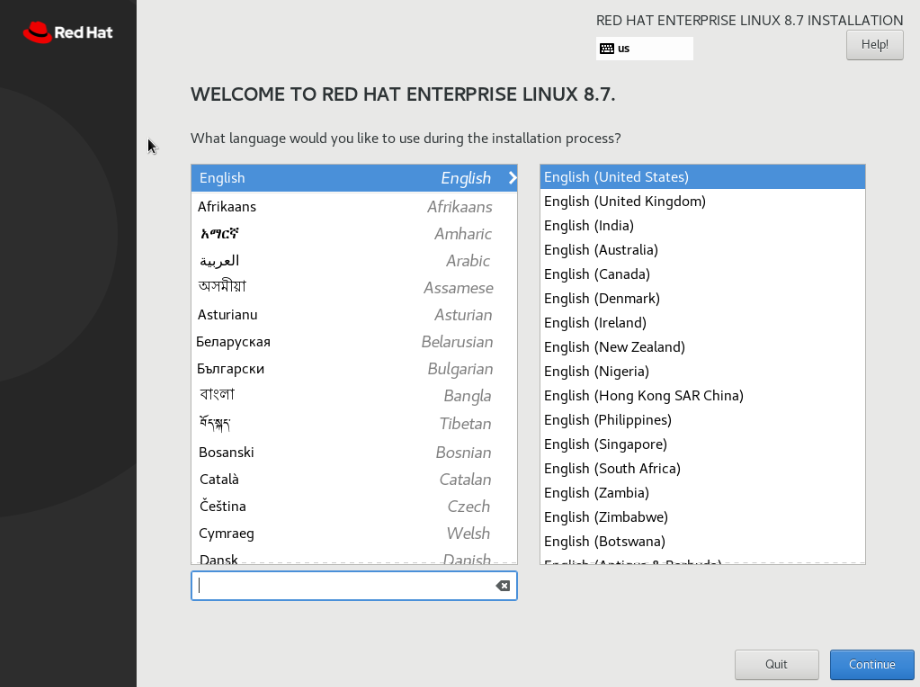
Language Selection
Next, you will see the Welcome screen to allow you to choose the list of languages, you can select the language and click on the Continue button located at the bottom right.
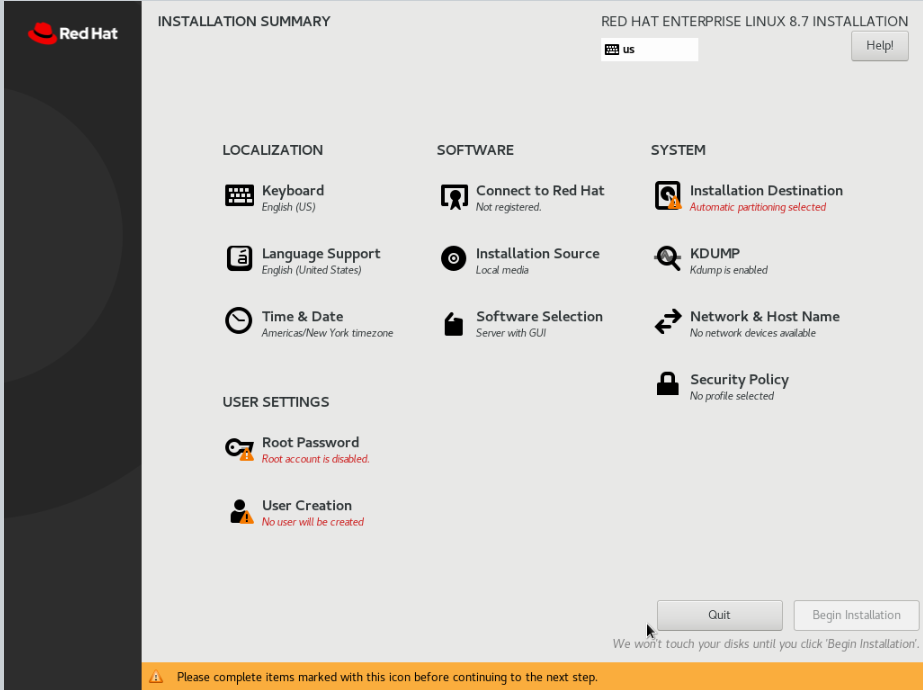
Installation Summary
After you have selected the language, it will bring you to the Installation Summary page. This page allows you to do all the configurations like setting the password for the root account, additional software installation, disk partition, network configuration etc.
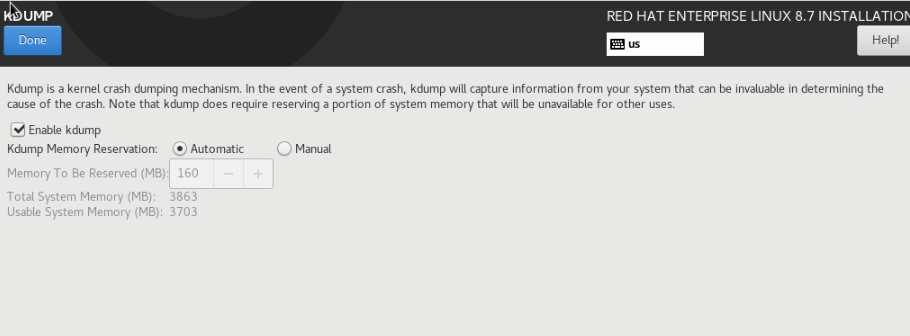
KDUMP
Essentially, it is one of features in RHEL perform kernel crash dumping procedure that is used to create dumps of the kernel memory when the system experiences a crash or a panic
If you disable kdump in RHEL, the system won’t reserve memory for the capture kernel, and it won’t create memory dumps in the event of a system crash. The implications of disabling kdump are:
Usually, for my personal preference, I will Disabled Kdump
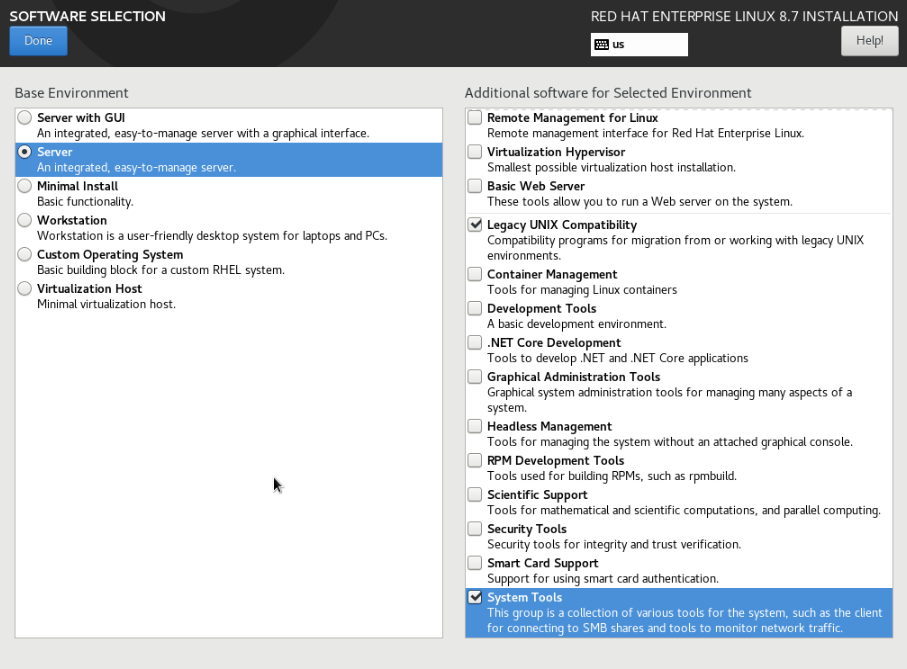
Software Installation
Usually, I will select the following but not too worried because you are still able to install all these easily after the OS installation
Here are some of my preference selections for my daily work
1. System Tools
2. Legacy Unix Compatibility
3. Mail Server
4. Network File System Client
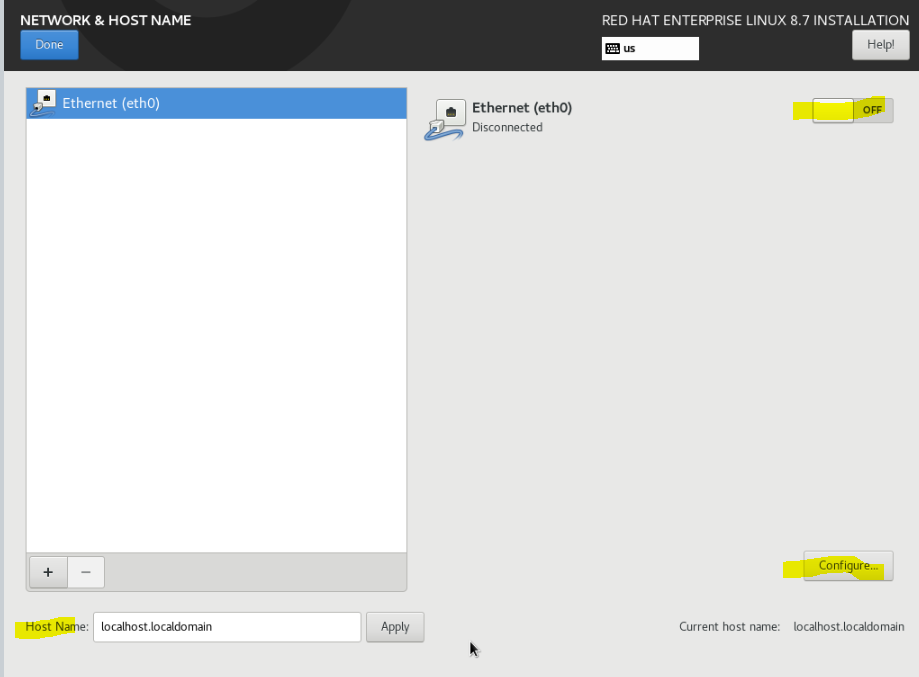
Configure Hostname & Network
Next, you can start configuring the hostname for your machine which is located at the bottom left.
For network configuration, you can enable the network interface by turning on and click on the Configure button to configure the netmask, IP address (if you are using a static IP address) and DNS
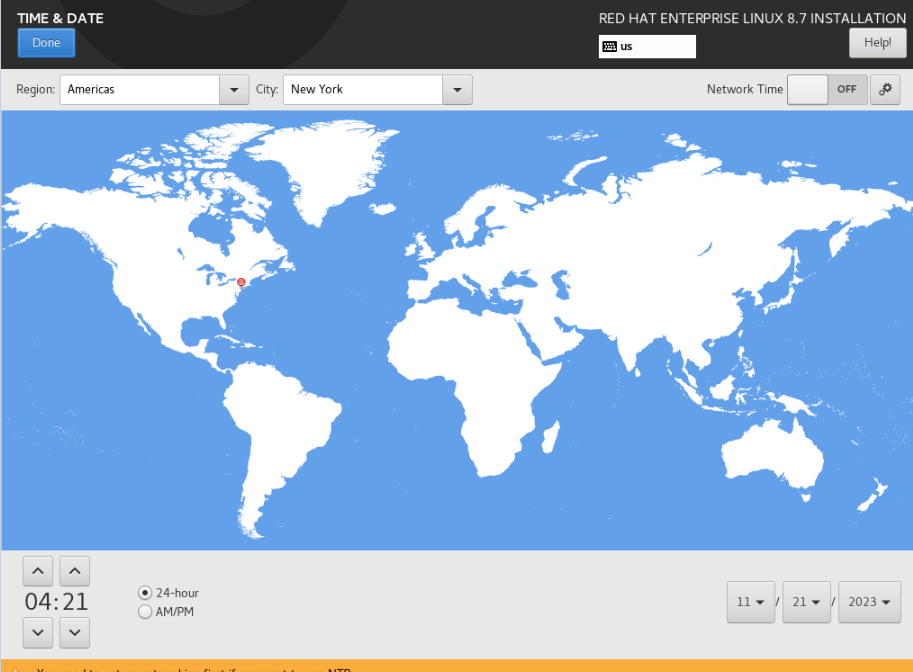
Timezone Configuration
You can configure the timezone by selecting the Region and City.
You also can turn on the Network Time to input your internal or other NTP servers etc.
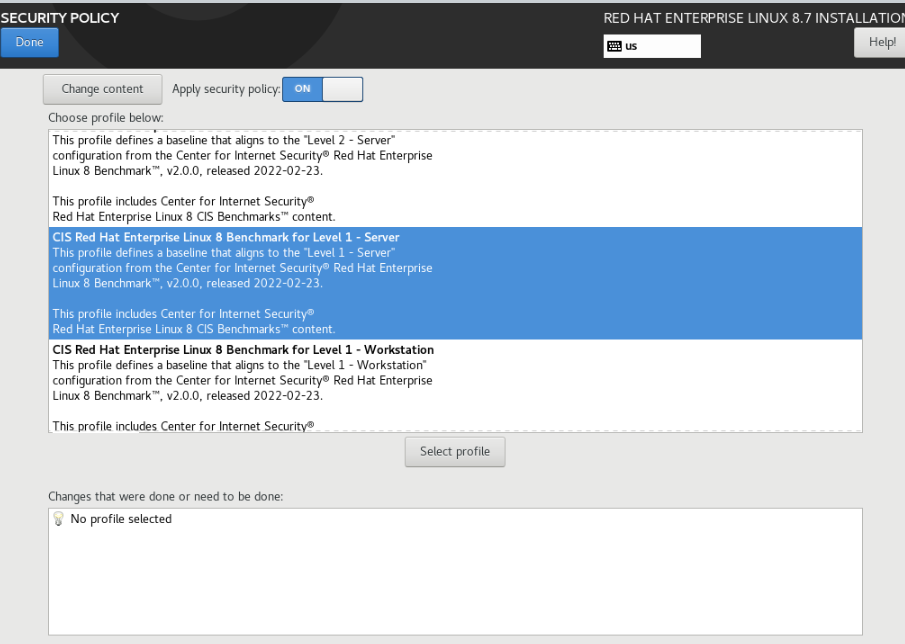
Select Security Policy
If your organization have policies that require to follow certain hardening standard, you can select the profile here easily and the system will automatically harden the OS for you.
In my case, I would be required to CIS L1 Benchmark to comply with the company’s policy so it will select CIS Red Hat Enterprise Linux 8 Benchmark Level 1, Server
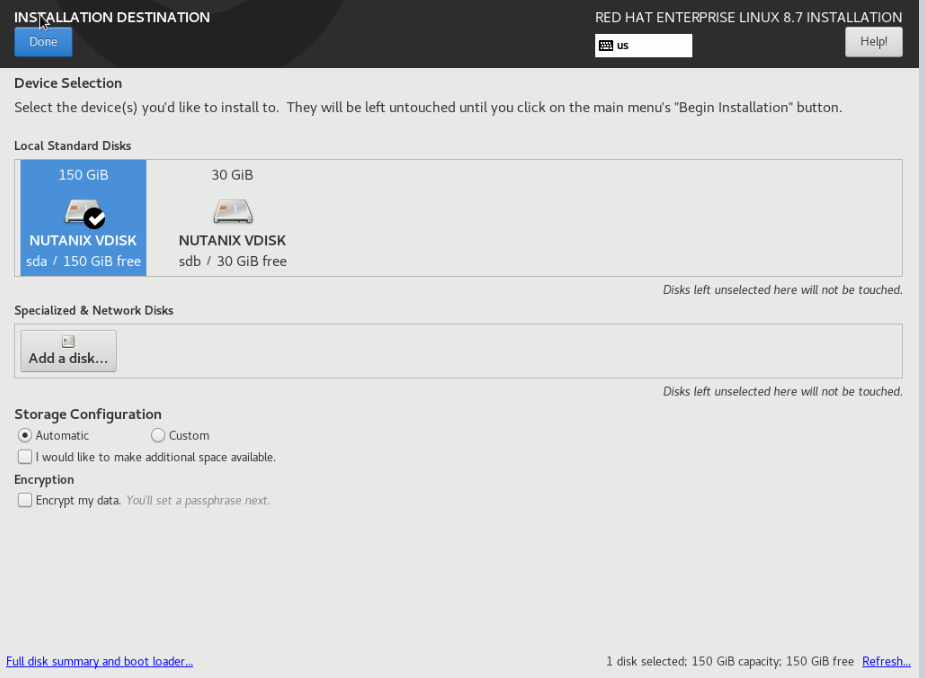
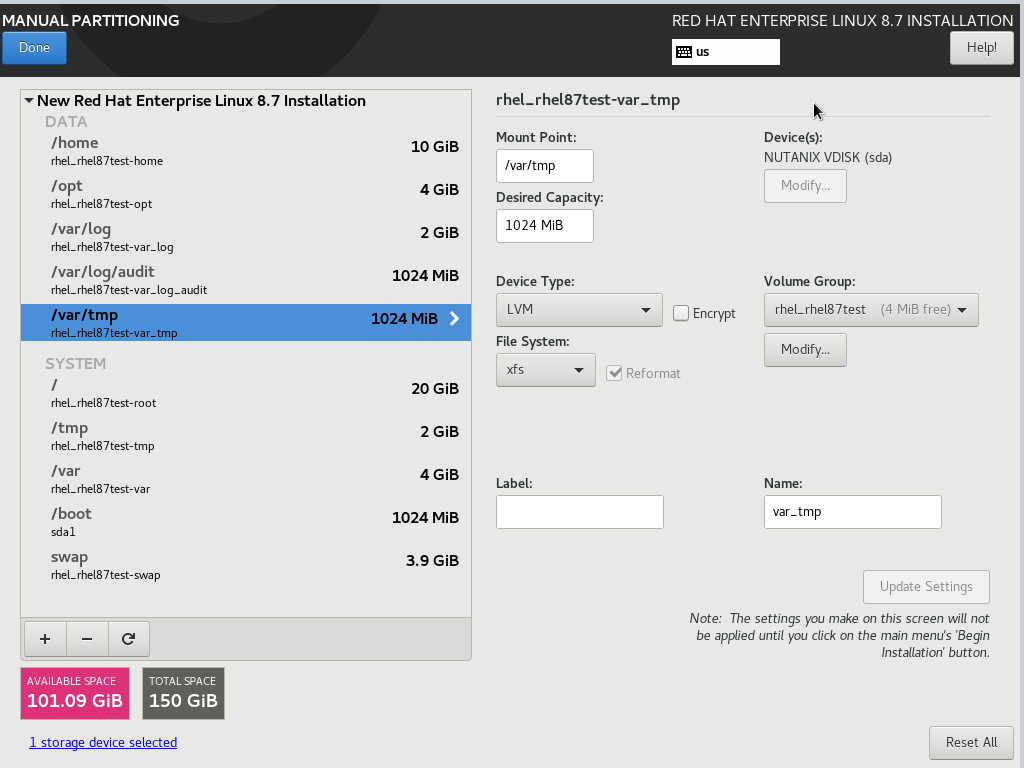
Configure Partitions and Disk
In this section, you will select the disk that you would like to install to and also I will be configuring manually mount points due to the CIS Level 1 security setting profile.
I have selected one of the disks, 150GB in this example and select Custom under Storage Configuration
Next, under the Manual Partitioning window, select Click here to create them automatically

It will helps you to create basic stuff like /home and /swap etc. In order to comply the CIS Level 1 benchmark, I will need to configure some of the Manual Mount Points and here is the list:
/var – 4g
/usr – 8g
/var/log – 1g
/var/tmp – 1g
/var/log/audit – 1g
/opt – 4g
/tmp – 2g
Configure Root password
You can create a new root password after selecting Root Password in the Installation Summary main window.

Create an additional user or admin account
Similarly, you can select Create User in the installation summary screen to create additional user and administrator accounts

Begin Installation
Lastly, once you back to the Installation Summary window, click on the Begin Installation button located bottom right to proceed with the installation. It should takes about 10-20 mins.

Wrapping Up
To sum up, the article provides a comprehensive guide with screenshots and step by step guide on installing Red Hat Enterprise Linux 8, with a special focus on adhering to the CIS Level 1 Benchmark for enhanced security.
It also outlines each step of the installation process, ensuring even those new to Red Hat can follow along easily. The integration of the CIS Benchmark standards highlights the guide’s commitment to security best practices, making it a valuable resource for system administrators and IT professionals looking to secure their Red Hat installations right from the start.